Table of Contents
Chalkboard Shelf Unit
This design is a 12-1/2 long shelf with a crate-like design. A metal strap joins them. The back is chalkboard material where you can write or doodle anything you want.
You don’t have to purchase chalkboard paint since you can find a chalkboard sheet in a hardware store. Make sure the sides are smoothened using sandpaper and avoid using glue. Finish with oil-rubbed bronze paint.
Box Shelves
This DIY project is possible with seven easy steps. SawsHub shares that box shelves combine a high-quality style with low-cost materials and are easy to do at home.
You may want to consider the plywood with void-free edges at the beginning of this project to produce high-quality racks. Choose your design and measure each box accordingly. This will help you when you start to cut them. Finish with spray paint.
Drink Caddy
In summary, the purpose of the project is to showcase the steps and tools needed to make the Beer Caddy for any occasion. A beer caddy can hold all kinds of bottles, and you can design it to keep more if you like.
It can be used for parties or any occasion and placed anywhere. It only requires a few pieces of wood, and some cutting tools mainly a saw cutter and more.
Toy Cars and Trucks
To make toy cars and trucks out of wood or pine board, you need a car template print-out. Trace the pattern on your pine board. Drill the holes of the car template. Remember to smooth out the edges using sandpaper.
This will give your toy a clean finish. Drill some holes for the wheels and then paint them. Use sandpaper again to smooth the texture of the paint.
One-sheet Plywood Leaning Shelf
Have you ever thought of making a shelf that can stand on its own? Well, here it is! This shelf leans against your wall.
It may look a bit dangerous but don’t worry – if you can put it all together correctly, it will be a tough cookie. All it takes to build this shelf is one sheet of plywood. If you want your shelf to be shorter, then you can cut the plywood into two.
Coasters
If you do not like having water or juice stains on your tabletop, then you might as well make a set of coasters.
The good thing is you can make your very own coasters using a square dowel. Use a glue gun to secure them in place. This DIY project is easy to make with few materials only. The fun part is decorating them with paint.
Jewelry Box
Everyone would want to make a profit out of their own hard work. If that is what you want then consider this piece a good sell. However, you also need to make sure you choose your materials wisely.
You can find a good wood that is sold cheaply. That will help you keep selling prices reasonable. Keep your designs simple to help highlight the jewels that will be contained in the box.
Adding felt brings a level of sophistication to the jewelry box. A useful tip before putting the felt linen would be to put a thin layer of glue and spread it evenly.
Decorative Keepsake Box
A keepsake box or a bedside box is something you would want to keep in your bedroom. This project is both beautiful and practically useful at the same time.
To complete this project, you need to follow exact measurements, especially when building the legs of the box. This will require thorough work, and you will need all the right tools.
Treasure Chest Toy Box
This project is ideal for clearing and storing toys. It has cool designs that kids will love it.
You will need to follow the template when building this treasure box strictly. Be careful when applying the outdoor spar urethane sealer. If applied evenly, it will give your toy box a nice attractive finish that will protect your project from dirt and dust.
Storage Box
Making a storage box will look like an easy project but do not let that fool you. This is the sort of project that will require some exact measurements. Make mistakes in the cutting of your wood pieces, and you may find yourself starting all over again from scratch.
It is a relatively large piece, and you will want to get things done perfectly from the start.
Vertical Planter Box
For this project, you will need some house numbers and a cedar fence picket. This house numbers planter is also another good project for beginners.
The house numbers, of course, are ready-made – you can use the same ones you use for your own house. This piece also doubles as a planter at the bottom. Of course, the plants that go into the box at the bottom are highlights that you can add later.
Bathtub Caddy
Relax with a glass of wine while soaking in your tub. Don’t worry about the possibility of the drink spilling over your bathtub. The best wood to use for your bathtub caddy is walnut. Use a water-based spar varnish urethane to improve its overall quality. This type of finish will protect the wood from wear.
Wood Serving Tray
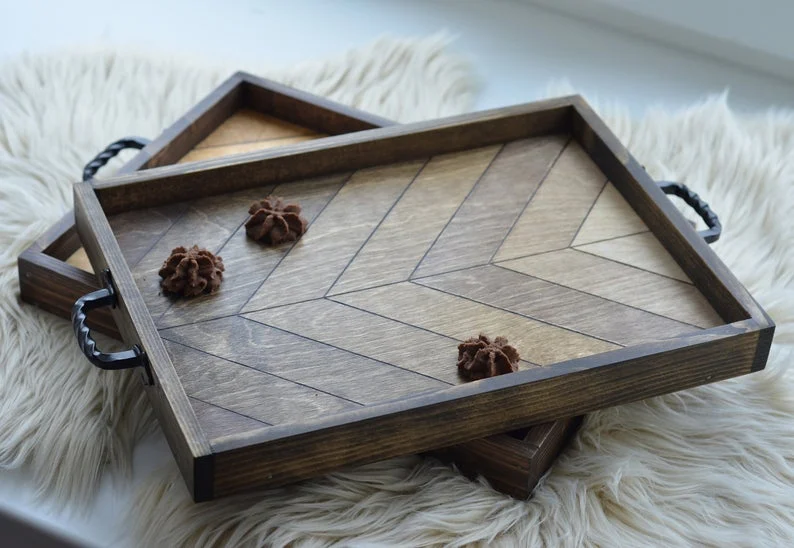
Decorate your table with this beautiful parquet serving tray. This is made of mahogany, cherry, and pine wood. Other materials used are drawer pulls, wood adhesive, chop/miter saw, bar clamps, the router with ¼ inch round over bit, random orbit sander, and sandpaper.
You can show your creativity by making different patterns.
This serving tray is very handy especially when eating outside. However, this should only be used as a serving tray and not as a chopping board.
Cutting Board
This cutting board is made of s4s lumber laminated together.
Select the wood to be used then cut them in such a way that the length and width is slightly greater than the actual dimensions you want it to have.
Once you have enough, arrange them to your desired pattern and glue them.
Then, flatten and square them. You can use a drum sander, belt sander or a planer to do this.
Route the edges and sand the board. Finally, apply finish and install the feet if you want.
Wooden Backgammon Board
Backgammon is among the oldest known board games. There are millions of backgammon players all over the world.
Today, it can be played using a device such as phones, tablets, or computers. But no one can deny that thousand years old game is more special when played using the original boards and pieces.
You can now make one at your home using only pieces of wood, hinges, clamps, wood glue, veneers, and contact cement.
Ladder Quilt Rack
Leave no more clothes on the floor with this easy-to-make ladder quilt rack. This simple ladder will help you organize your room in a creative way. This project only costs below 40$.
The materials needed are woods, dowel, wood glue, combined stain, and varnish, and felt pads. They are made into a ladder quilt rack using a paintbrush, measuring tape, vice or clamps, handsaw, drill, drill bit, sandpaper, and workbench.
Wine Rack
This is a functional and convenient wine rack that you can place on your patio. Any DIY person can make this simple and affordable project. You will only need a 1×4 and 2×4 lumber.
You will also have to use Polyshades Antique Walnut Finish, screws, nails, and wood glue. The tools needed are a saw, drill, orbital sander, jigsaw, hammer and nails, wood clam, drill bit, carpenters square, and tape measure.
Rustic Wall Art Panel
Make your wall more awesome today with a rustic feel with this DIY wall art panel.
This project needs three pieces of shiplap boards, two 1x2s, dark graphite pencil, scissors, acrylic craft paint with a paintbrush, foam brush, hammer, twelve 1” nails, and the text that you will put on your panel. You can print the text on a coupon bond.
The only limit now for making your walls beautiful is your imagination and creativity. This is also great as a gift.
Mini Planter Boxes
Rounded pots are common for garden plants. Why not make your garden more different from these mini planter boxes?
This is very easy to do and needs only cheap materials. You will only need pieces of wood. You don’t have to buy one. You can use reclaimed woods in from your backyard.
The wood pieces are cut according to your desired size, then they are glued together to form a box using wood glue.
Wood Sign With A Vinyl Stencil
Wood sign with a vinyl stencil is great if you want to fill your room with motivational quotes. They are also great for making your room more stunning.
The most important thing you need here is a vinyl cutting machine. Or, you can create the sign using a wood transfer method.
Other materials needed are printable JPEG file of the design you want to make, vinyl, vinyl weeding tool, transfer tape, vinyl squeegee or old credit card, painter’s tape, and painted wood sign backing.
Entryway DIY Shoe Rack
Always stressed by shoes piling up in your doorways? This entryway DIY shoe rack is a way for you to organize them. This project will only cost you less than $15 for the materials.
You will need 2×2 @ 8 feet, 1×12 @ 6 feet, 2 ½ inch, 2 inch, and 1 ¼ inch wood screws, paint, stain, polyurethane, and lightweight spackle. The tools you will need are a miter saw, drill, and clamps.
Wall Planter With Succulents
Succulents have a lot of benefits. They help purify the air in your home, prevent diseases, and even help you focus. Aside from these, they can also beautify your home using this DIY wall planter. You can get all of these for only about $10.
You will only need pieces of wood, drill, workbench, jigsaw, screws, wood glue, hammer, nails, and stain.
Aside from being fully customizable, this wall planter can save a lot of space in your room.
Bird Feeders With Real Tools
This adorable DIY from Inner Child Fun is easy to make that even kids can do it, provided there is adult supervision of course.
While this project can be a great way to bond with the children, it can also serve as a training ground for hand-to-eye coordination and enhance self-awareness for the tools around them. Not to mention the great fun they will have in handling real adult tools and learning how to use them!
Wood Cutting Board
This wood crafting project from Mr. Lentz serves as a reminder that gifts chosen with a lot of thought are much more valuable than those attached with a high price tag.
Just like this personalized cutting board which he made as a gift to his girlfriend, sometimes the simple things are enough to show the appreciation and care for another person.
The memories made while making the gift will also make it much more precious and valuable in anyone’s eyes.
Simple Wooden Jewelry Box
While wood-crafting consists of various pieces, boxes are usually the most versatile of the projects since they can be used for storing anything.
One example is this simple jewelry box from FixThisBuildThat.com that any beginner would want to try before advancing onto more complex projects.
While this tutorial describes how to make a jewelry box, you can personalize your output that it can be used to store keepsakes and mementos that matter.
Metallic And Wood Pencil Holder
Taken from Purely Katie, this pencil holder is a nice addition that can be placed at home or in the office to store supplies.
While the body of the holder is easy to make, the best part about this is that you can personalize the color and design of the holder in any way you want to match your preferred theme. It can also be given as a gift to a friend, or a special someone who you know has a lot of office supplies.
Rustic Wood Plank Clock
It can be admitted that this clock-while big in size-is is definitely charming in its own rough way.
While the outcome seems complicated, Making it in the Mountains certainly makes it sound so easy that anyone can do it with the right tools, attitude, and resources.
You can surely personalize your own project by adjusting the size to one that perfectly fits your home and your own sense of style.
Minimal Wood Spice Rack
A well-organized kitchen makes for a smooth preparation process and a tasty result.
Arranging spices in a neat and orderly way is a must for a well-functioning kitchen since misplacing a spice-or worse, mixing them up-changes the flavor, texture, and safety of the food being prepared.
These adorable little steps made from some pine wood and woodworking tools can easily function as an organizer for all your spice collection, and to keep the mess at bay.
DIY Wooden Candle Holders
For the candle lovers out there who love the ambiance and warmth given by a cozy candle, this candle holder may be a great DIY project for you.
Although it takes quite a bit of skill and power tools to make this type of candleholder, the output is definitely worth the effort and time necessary to make it. And if you make a few imperfections along the way, just remember that these imperfections give the output its own unique personality and style.


