
Table of Contents
When the weather is good, using your yard as much as possible is vital as it connects you closer to nature and allows you to get fresh air and vitamin D from the sun. It’s best to try and utilize your yard as much as possible, encouraging outdoor living and socialization. And what’s a better way to do this than making your very own outdoor kitchen?
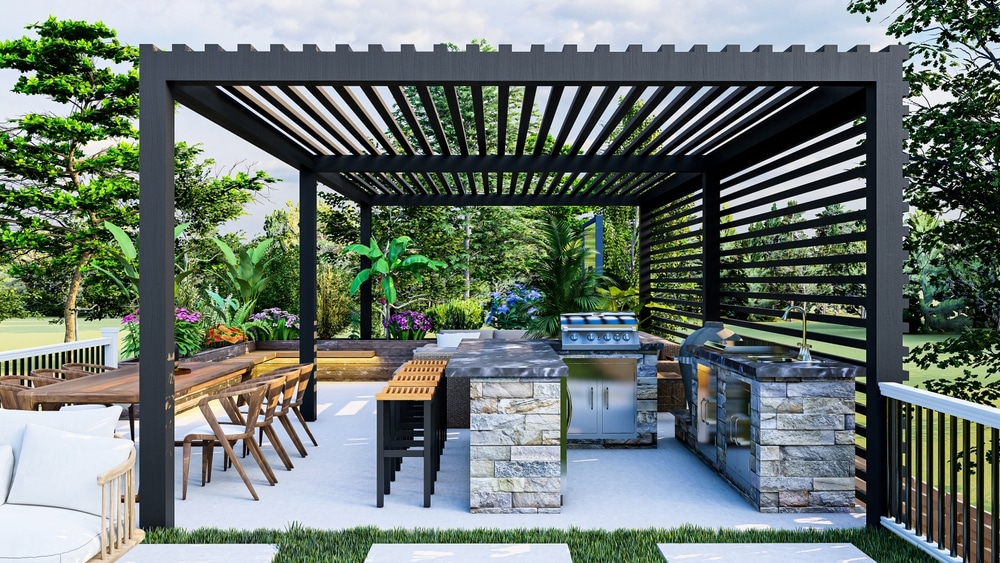
Outdoor kitchens are the perfect addition to your yard as they are versatile. They can allow you to venture into different cuisines and enjoy intimate al-fresco dinners with your family. They are also the perfect opportunity to host friends and family and have a fun evening of eating and drinking while socializing. You can just have a simple barbecue to achieve this, but an outdoor kitchen offers so much more than a place to cook. You can have storage space, areas for food preparation and plating, a sink to clean afterward, and electrical appliances.
See how you can build your own practical outdoor kitchen to make this outdoor dining and hosting dream a reality.
Make a plan & find the best spot
Before you can get to building an outdoor kitchen in your yard, you need to make a plan and find the best spot. Planning and assessing your yard space is essential as it helps you determine the size kitchen you can have and makes the building process easier. Think about the design and what you want around your kitchen. You may want it near a wall to protect and shelter the kitchen from the wind or you may want it on a patio. Once you’ve determined this, you need to start zoning your garden. Consider the base of the kitchen. Would you like stone, outdoor tiles, or decking? You should also try to imagine your kitchen and see if you picture a sink and appliances or if it’s more basic. Does it have plenty of countertop space and storage or is it a more compact one?
The best spot in your yard should provide some shelter to prevent high winds from reaching your kitchen. You should also avoid a really sunny patch of the yard as you don’t want to be constantly cooking in direct sunlight. If there isn’t much shade, you could think about creating a canopy to shelter the kitchen. You should also think about if you want your outdoor kitchen to be opposite your house so you can easily bring items outside and back in, or if you want it further away, so the dining area becomes a stand-out feature.
You should also try and choose a more private spot that isn’t overlooked by neighbors and your kitchen needs to be a safe distance away from flammable materials. When you’ve worked this out, you will need to work out a practical budget. Initially, you can work out the cost of your dream outdoor kitchen. Think about the cost of materials, appliances, plumbing if you want a sink, electricity, and any other costs for items you need. From this, you can see if it suits your finances or if you need to make compromises.
Think about the tools you need
The tools you will need to build your outdoor kitchen will depend on the style you want to create and its features. However, there are a few must-have tools no matter what type of kitchen you’re creating.
- Drill
- Tape measure
- Spirit level
- Hammer
- Screwdriver
- Saw
- Screws
- Nails
- Brackets
- Protective sprays
- Paint if decorating the structure.
Pick weather-friendly materials
When it comes to materials to use for your outdoor kitchen, you need to find weather-friendly ones. This is especially the case if you live in an area that has unpredictable weather conditions, as your kitchen will need to withstand heat, rain, and even snow. Your kitchen won’t be practical if you use similar materials as your indoor one because those materials are more likely to get worn and torn.

Due to this, for your base, it may be best to choose slab tiles. This is more weather-proof than wooden decking as this can be worn with the weather. Decking fades in the sun and has to be maintained constantly, while tiles are a practical flooring choice and are low maintenance.
For your drawer fronts, cupboard fronts, and even the structure of the kitchen, you can choose aluminum. This metal is robust and sturdy, so it’s ideal to look for aluminum suppliers near me for your outdoor kitchen. This material doesn’t rust easily either, meaning it can withstand all sorts of weather!
When it comes to your kitchen countertops, you need to pick strong materials that can last long no matter the weather. Granite, teak, and frost-resistant ceramics are best for this as they are great for colder temperatures and are resistant to moisture and UV rays! This means they can withstand any weather, giving you a low-maintenance and long-lasting outdoor kitchen.
Get to building
Once you have all the right materials, appliances, décor, and tools, you can get to the fun part, building! Now, for more detailed and difficult designs, you may need to get some professional help for parts. For example, you will need to get an electrician and plumber if you want appliances and a sink. However, no matter the type of outdoor kitchen you’re aiming for, you will be able to build part of it. Follow the basic steps below to help guide you in building a practical kitchen:
- Make a basic frame structure: Measure and cut the material of your frame structure. Make sure you have legs in each corner and horizontal frames to make it more robust. Drill holes and use outdoor screws to join the structure together.
- Add support frames: Add more horizontal support frames between the legs and use glue and screws to attach the pieces.
- Cover the frame: Cover the frame with the material you have chosen and secure it with nails.
- Attach the countertop: Measure and cut your countertop and make cutouts for sinks and cooking equipment. Place it and check that it’s level with the spirit level and secure using brackets.
Personalize your kitchen
When the outdoor kitchen is built, you can personalize it to suit your tastes and lifestyle. You can add clever storage solutions to allow you to have everything you need in one space, making outdoor cooking easier. You should also consider lighting and the ambiance you want to set for the kitchen. Lighting also lets you cook after sunset, maximizing the use of your kitchen in your yard! You could have warm lighting to create a relaxed vibe, this is perfect for the dining area to create an intimate setting. For cooking areas of the kitchen, think about spotlights to highlight and focus on one spot, helping you to see clearly.
Lay out your appliances, such as a coffee machine, fridge, toaster, microwave, air-fryer, and anything else, and create zones for them. For example, the coffee machine and toaster could be together for outdoor breakfast. You should also consider where glasses, utensils, drinks, mugs, and dishes should go. You could put them in storage solutions or have some out on display, especially the selection of drinks!
Lastly, you can add any final décor touches to the kitchen area. Create a dining space with a table and chairs, and even a cozy sofa for relaxing with family and friends. Have plants in your kitchen and dining area and put up artwork, neon signs, and anything else you love!
Use this guide on how to build a practical outdoor kitchen for your yard to utilize your outdoor space as much as possible, no matter the weather. You can enjoy the outdoors for some vital ‘me’ time in the evenings with a blanket, drink, and snack, or host your friends and family for a dinner party. You could even use it daily with your family for intimate meals!